Tutorial - Integrate EJBCA with SPIFFE SPIRE Server
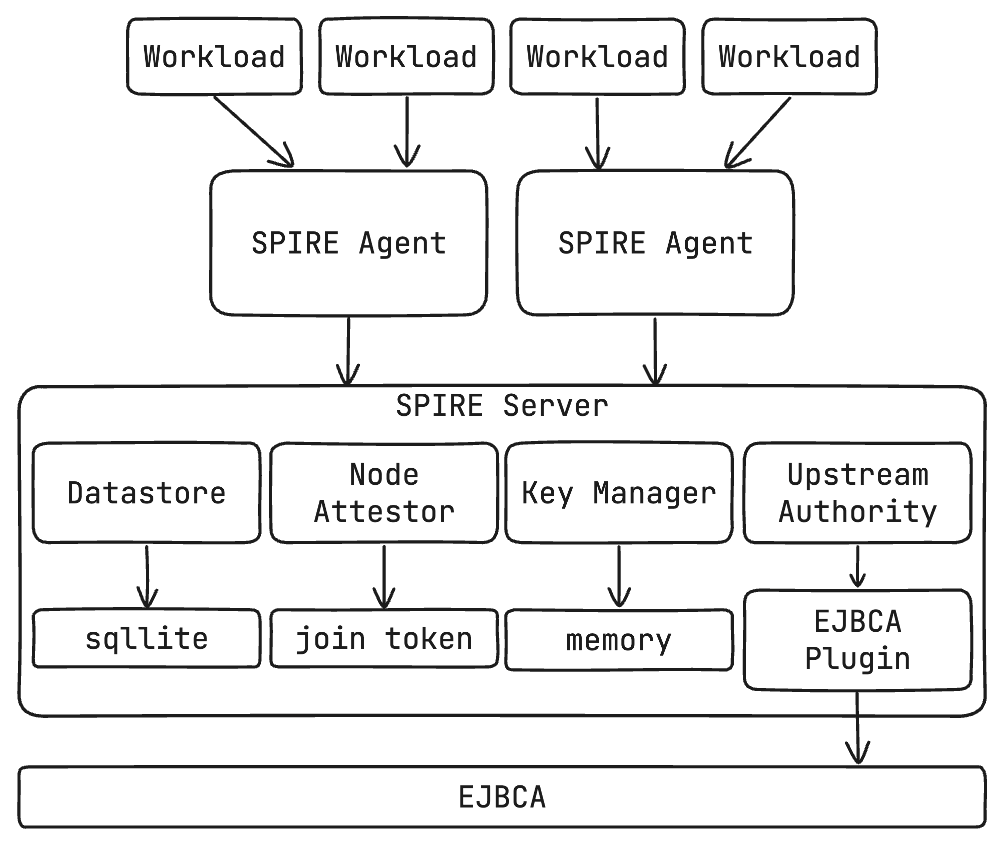
This tutorial teaches you how to run SPIFFE SPIRE configured to use the EJBCA UpstreamAuthority Plugin. The EJBCA UpstreamAuthority plugin enables SPIRE to issue workload identities as part of a trusted PKI using EJBCA.
You should follow this tutorial if you want to:
Use the SPIRE implementation of the SPIFFE framework to provide workload identity.
Issue workload identity certificates as part of an EJBCA PKI.
In this tutorial, you will:
Prepare EJBCA
Compile SPIRE Server and SPIRE Agent
Configure SPIRE Server using the EJBCA UpstreamAuthority plugin
Start SPIRE Server
Attest a SPIRE Agent to the Server using a join token
Fetch an x509-SVID from SPIRE Agent over the SPIFFE Workload API
Prerequisites
EJBCA Community Docker container version 8.3.2 was used in this tutorial.
This tutorial is valid for both the EJBCA EJBCA Community and Enterprise containers. For more information on the EJBCA Enterprise container, see EJBCA & SignServer Enterprise Container documentation.
Before you begin, you need a running EJBCA container with:
A Client Certificate and corresponding Private Key with permissions to use the EJBCA REST API.
Access to the EJBCA Admin Web UI.
At least one configured Certificate Authority.
You can follow the EJBCA - Getting started with Kubernetes guide to deploy EJBCA in Kubernetes on your computer.
Additionally, you need:
A 64-bit Linux or macOS environment
The
opensslcommand line toolGo 1.13 or higher to build SPIRE. See https://golang.org/dl/ or run
brew install golang.The
Makecommand line tool
Step 1 - Prepare EJBCA
Follow these steps to prepare and configure EJBCA.
Enable EJBCA Certificate Management REST API
To prepare EJBCA, you must first enable the EJBCA REST Certificate Management.
In the EJBCA Admin UI, under System Configuration, click System Configuration.
Click on Protocol Configuration.
Click Enable next to REST Certificate Management. You should see
 Enabled.
Create a Certificate Profile
Next, you will create a Certificate Profile capable of issuing intermediate certificates for SPIRE Server. SPIRE Server uses an intermediate (CA) certificate to sign workload identity certificates.
In the EJBCA Admin UI, under CA Functions, click Certificate Profiles.
In the text entry at the bottom of the List of Certificate Profiles table, type spireIntermediateCA and click Add.
Click Edit next to the spireIntermediateCA entry in the table.
Configure the following fields:
Type: Sub CA
Available Key Algorithms: ECDSA
Available ECDSA curves: P-256 / prime256v1
Signature Algorithm: SHA256WithRSA
Validity or end date of the certificate: 2d
Available CAs: Your Issuing CA
Click Save.
Create an End Entity Profile
Next, you will create an End Entity Profile that defines the properties and constraints of the SPIRE intermediate certificates being issued.
In the EJBCA Admin UI, under RA Functions, click End Entity Profiles.
Under Add End Entity Profile, enter spireIntermediateCA, and click Add.
Click spireIntermediateCA in the List of End Entity Profiles table, and click Edit.
Configure the following fields:
Subject DN Attributes
serialNumber, Serial number (in DN)[modifiable]O, Organization[modifiable]C, Country (ISO 3166)[modifiable]
Other Subject Attributes
Uniform Resource Identifier (URI)[modifiable]
Available Certificate Profiles: Ensure spireIntermediateCA is selected.
Available CAs: Your Issuing CA.
Click Save.
Step 2 - Build SPIRE
To build SPIRE, clone the source code and use the build Makefile target.
Clone SPIRE locally to your machine by running the following commands:
git clone --single-branch --branch v1.11.0 https://github.com/spiffe/spire.gitcdspireBuild SPIRE Server and Agent by running the following command:
makebuild
Step 3 - Configure SPIRE with the EJBCA UpstreamAuthority plugin
To configure SPIRE server to use the EJBCA UpstreamAuthority plugin, you will locate your client certificate and key used to authenticate with EJBCA and configure the Server conf file with the values you prepared in Step 1 - Prepare EJBCA.
Locate your EJBCA client certificate and private key, and export their paths as environment variables.
exportEJBCA_CLIENT_CERT_PATH=/path/to/superadmin.pemexportEJBCA_CLIENT_CERT_KEY_PATH=/path/to/superadmin.keyLocate your EJBCA server CA certificate and export its path as an environment variable. This is the certificate that you used to secure the Ingress route to EJBCA.
exportEJBCA_CA_CERT_PATH=/path/to/ingress-ca-cert.pemCreate the SPIRE Server configuration file.
cat <<EOF > server.confserver {bind_address ="127.0.0.1"bind_port ="8081"trust_domain ="example.org"data_dir ="./.data"log_level ="DEBUG"}plugins {DataStore"sql"{plugin_data {database_type ="sqlite3"connection_string ="./.data/datastore.sqlite3"}}NodeAttestor"join_token"{plugin_data {}}KeyManager"memory"{plugin_data = {}}UpstreamAuthority"ejbca"{plugin_data {hostname ="localhost"ca_cert_path ="$EJBCA_CA_CERT_PATH"client_cert_path ="$EJBCA_CLIENT_CERT_PATH"client_key_path ="$EJBCA_CLIENT_CERT_KEY_PATH"ca_name ="Sub-CA"end_entity_profile_name ="spireIntermediateCA"certificate_profile_name ="spireIntermediateCA"end_entity_name =""account_binding_id =""}}}EOF
Next, configure the SPIRE Agent to trust the CA that will issue intermediate CA certificates used to sign workload identity certificates.
In the EJBCA RA UI, click CA Certificates and CRLs.
Download the PEM certificate chain for the CA that you will be using to issue Intermediate CAs for SPIRE.
Move this certificate to a known location and export its path as an environment variable.
export EJBCA_ISSUING_CA_CERT_PATH=/path/to/issuing-cacert.pemCreate the SPIRE Agent configuration file.
cat <<EOF > agent.confagent {data_dir ="./.data"log_level ="DEBUG"server_address ="127.0.0.1"server_port ="8081"socket_path ="/tmp/spire-agent/public/api.sock"trust_bundle_path ="$EJBCA_ISSUING_CA_CERT_PATH"trust_domain ="example.org"}plugins {NodeAttestor"join_token"{plugin_data {}}KeyManager"disk"{plugin_data {directory ="./.data"}}WorkloadAttestor"unix"{plugin_data {}}}EOF
Step 4 - Start SPIRE Server and generate a token to attest a SPIRE Agent
To start SPIRE Server, run the compiled binary as a background process. Then, generate a join token that the SPIRE Agent will use to attest (authenticate) with the server. Join tokens are one-time-use.
Start the SPIRE Server as a background process.
bin/spire-server run -config server.conf &INFO[0000] X509 CA prepared expiration="2034-10-30 12:49:48 -0700 MST"issued_at="2024-11-01 14:06:57.580516 -0700 MST"local_authority_id=a2ff2082452a002e88907c923821c7df02c88c36 self_signed=falseslot=A subsystem_name=ca_manager upstream_authority_id=74a171872a501e46fecf2db6e1d640545f315025INFO[0000] X509 CA activated expiration="2034-10-30 12:49:48 -0700 MST"issued_at="2024-11-01 14:06:57.580516 -0700 MST"local_authority_id=a2ff2082452a002e88907c923821c7df02c88c36 slot=A subsystem_name=ca_manager upstream_authority_id=74a171872a501e46fecf2db6e1d640545f315025INFO[0000] Creating a new CA journal entry subsystem_name=ca_managerDEBU[0000] Successfully stored CA journal entryindatastore ca_journal_id=1 local_authority_id=a2ff2082452a002e88907c923821c7df02c88c36 subsystem_name=ca_managerDEBU[0000] Successfully rotated X.509 CA subsystem_name=ca_manager trust_domain_id="spiffe://example.org"ttl=3.15355370192041e+08...INFO[0000] Starting Server APIs address="127.0.0.1:8081"network=tcp subsystem_name=endpointsINFO[0000] Starting Server APIs address=/tmp/spire-server/private/api.sock network=unix subsystem_name=endpointsVerify that SPIRE Server is running:
bin/spire-server healthcheckServer is healthy.Generate a join token for the SPIRE Agent, and export it as an environment variable.
export TOKEN=$(exec bin/spire-server token generate -spiffeID spiffe://example.org/host | awk '{print $2}')echo $TOKENfce80504-500e-4b3c-bc2b-409302c440aa
Step 5 - Start a SPIRE Agent
To start a SPIRE Agent, run the compiled binary as a background process using the one-time-use join token created earlier.
Start SPIRE Agent as a background process using the join token.
bin/spire-agent run -config agent.conf -joinToken"$TOKEN"&INFO[0000] Starting agent with data directory:"./.data"...INFO[0000] Creating X509-SVID entry_id=2863dd03-050e-4d7a-bf32-b6c1e45558d9 spiffe_id="spiffe://example.org/host"subsystem_name=managerDEBU[0502] Signed X509 SVID authorized_as=agent authorized_via=datastore caller_addr="127.0.0.1:62205"caller_id="spiffe://example.org/spire/agent/join_token/fce80504-500e-4b3c-bc2b-409302c440aa"entry_id=2863dd03-050e-4d7a-bf32-b6c1e45558d9 expiration="2024-11-01T22:15:19Z"method=BatchNewX509SVID request_id=60b9bcf5-8705-4ee2-a6c5-76c923476a6a revision_number=0serial_num=86991583435265654855032218279933190658service=svid.v1.SVID spiffe_id="spiffe://example.org/host"subsystem_name=apiDEBU[0000] SVID updated entry=2863dd03-050e-4d7a-bf32-b6c1e45558d9 spiffe_id="spiffe://example.org/host"subsystem_name=cache_manager
Step 6 - Create a registration entry
For SPIRE to identify a workload, the workload needs to be registered with the SPIRE Server. For this tutorial, we create a registration entry based on the current Unix UID. Refer to the SPIRE docs for a complete list of workload attention methods.
Create a registration entry based on the current Unix UID.
bin/spire-server entry create -parentID spiffe://example.org/host \-spiffeID spiffe://example.org/myservice -selector unix:uid:$(id -u)Entry ID : 66aa8f5b-b152-4acc-a748-7f152b37156fSPIFFE ID : spiffe://example.org/myserviceParent ID : spiffe://example.org/hostRevision :0X509-SVID TTL :defaultJWT-SVID TTL :defaultSelector : unix:uid:502
Step 7 - Fetch and view an x509 SVID
Fetch an x509 SVID from the SPIRE Agent. This process replicates how a workload would fetch an identity from the SPIRE Agent to, for example, authenticate the workload to another workload.
Fetch an x509 SVID from the SPIRE Agent.
bin/spire-agent api fetch x509 -write .Received1svid after254.109375msSPIFFE ID: spiffe://example.org/myserviceSVID Valid After:2024-11-0121:22:57+0000UTCSVID Valid Until:2024-11-0122:23:07+0000UTCIntermediate #1Valid After:2024-11-0120:56:57+0000UTCIntermediate #1Valid Until:2034-10-3019:49:48+0000UTCIntermediate #2Valid After:2024-11-0119:50:32+0000UTCIntermediate #2Valid Until:2034-10-3019:49:48+0000UTCCA #1Valid After:2024-11-0119:49:49+0000UTCCA #1Valid Until:2034-10-3019:49:48+0000UTCWriting SVID #0to file svid.0.pem.Writing key #0to file svid.0.key.Writing bundle #0to file bundle.0.pem.Use the
opensslcommand to view the contents of the SVID:openssl x509 -in svid.0.pem -text -nooutCertificate:Data:Version:3(0x2)Serial Number:fb:47:9f:4c:dc:ba:64:cd:8f:e3:4f:f5:5b:b5:2e:0cSignature Algorithm: ecdsa-with-SHA256Issuer: serialNumber=166101901659418739104792428097135422316, O=SPIFFE, C=USValidityNot Before: Nov121:22:572024GMTNot After : Nov122:23:072024GMTSubject: C=US, O=SPIRESubject Public Key Info:...
Cleanup
To clean up the tutorial, delete the SPIRE directory and exit the terminal session to kill the Server and Agent processes running in the background.
Remove the
spiredirectory.cd ..rm -rf spireTerminate the shell.
exit0
Next steps
In this tutorial, you learned how to configure SPIRE Server with the EJBCA UpstreamAuthority plugin.
Here are some next steps we recommend:
Follow the SPIRE Quickstart for Kubernetes tutorial to deploy SPIRE Server and Agent to attest workloads in Kubernetes.
Unable to render include or excerpt-include. Could not retrieve page.